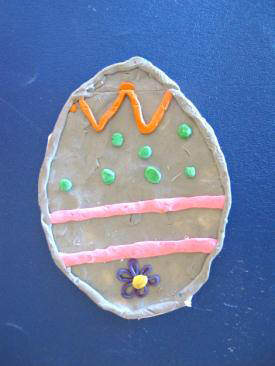
Old CD case Egg-Shaped "backer"
Making Plasticine Pictures
(Relief Sculptures)
Materials
Newsprint & pencils (to sketch a “plan”; cut paper same size as the “backer
boards”)
Backer boards (e.g. cardboard or boxboard; 4”x6” or 4.5”x6”; 1 per student)
Plasticine Plasticine cutting tool (strong gauge fishing line strung between
popsicle stick „handles‟)
Plasticine tools for texture (e.g. old pencils, combs, plastic forks, popsicle
sticks…)
Paper towel (coarse school ones work well for wiping oily residue from hands
between colours!)
PowerPoint “Making a Plasticine
Picture” link in PowerPoint for
www.barbarareid.ca
Barbara Reid picture books
Clean-up list
Looking at Art: Illustrations
by Barbara Reid…
Ø
Did she cover the whole board with Plasticine? (no board left showing!)
Ø
Do you see a Horizon Line? (where the sky meets the ground)
Ø
Guess what part of the picture she made first (eg. background/sky or part that
is furthest away!)
Ø
What details do you see? How do you think she created the texture (e.g. grass)?
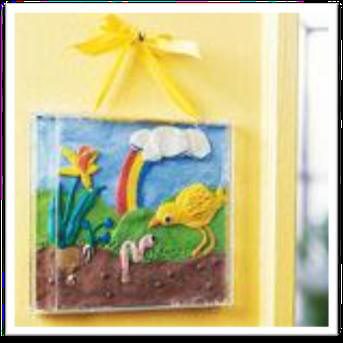
Focus on one particular illustration (e.g. child in sled)…
Ø
What did Barbara Reid make first? (the sky, then the snowy ground)
Ø
Where is the horizon line? Can you trace the horizon line with your finger?
(where the sky meets the ground)
Ø
What colours did Barbara Reid use?
Ø
What shapes did Barbara Reid use? (circles for snowflakes, rectangles for the
sled, squares for the checkered blanket…)
Ø
What is the biggest thing in the picture? (the child in the sled = MAIN THING!)
Create
PROCESS – Plan and Background
Start with a plan!
ü
Teacher Tip… Decide in advance on the subject (eg. favourites – animals, foods,
hobbies; places – home, school; people – family, friends, pets; nature – flower,
tree, snowman, rainbow, animals…)
ü
Teacher Tip: The horizon line will help you understand where the sky and ground
need to be „spread‟ over the entire backer board. Sticking to ONE MAIN THING
that is BIG will help you develop an idea that is suitable for this medium.
Guidelines:
1. Horizon line (where the sky meets the ground)
Ø
Note: If inside, include a line that shows where the wall meets the floor.
Images of underwater scenes, or scenes in outer space, may not require a horizon
line.
2. One main thing
3. Make it BIG (using simple shapes)
Starting on the Backer Board…
Ø
Print your name on the back with pencil
Ø
Lightly draw just the horizon line only on your cardboard
Ø
Start with the part that is furthest away (for most, will be the sky).
Ø
Look at all of the colour possibilities choose one or two colours to start your
background
Ø
”Tear” a BLUEBERRY-SIZED piece of Plasticine from the chunk, warm it by rolling
in the palms of your hands, and spread over the background using your fingers
and thumbs.
Ø
Fill the sky with Plasticine so that you cannot see the cardboard.
Ø
Then, go on to the ground next (snow or grass or road…), filling the portion of
the backer board below the horizon line.
Keep the Plasticine clean!
SESSION 2: Main Subject
Barbara Reid has described TWO basic shapes that can be used to make almost
anything from Plasticine:
1. “PANCAKE” (Roll a small ball/sphere. Set it on your workspace and
press down on it with your thumb to flatten.)
“What could this be used for?”
(head, sun, wheel, middle of flower, snowman…)
2. “NOODLE” (Roll a thin „worm‟/cylinder. Set it on your workspace and
flatten slightly. Try this again with a short, thick cylinder.)
“What could be these be used for”?
(blades of grass, legs, arms, antenna, stems, hair…)
DETAILS
(e.g., “eye” starting with a white pancake, then adding a smaller black pancake
on top for the pupil)
TEXTURE
using tools to carve or etch into the Plasticine.
Tips:
ü
SOLID shapes versus just outlines – you shouldn't see see through it;
ü
“Build”
the parts you need on your workspace, then transfer them to the background
(avoids smudging or Plasticine sticking if you need to make a change/correction)
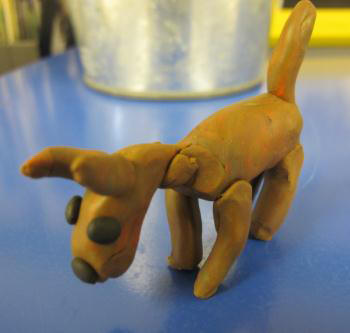
ü
LAYER (like a pizza! eg. dog… what first!? Body first, then head, legs, ears,
mouth, spots, collar, eyes and other details later!)
ü
WIPE hands between colours (wipe on DRY cloth!)
ü
Work with a limited # of colours at your workspace at any time (eg. 3)
Clean-Up
1. Plasticine stored/displayed safely (e.g. along white board ledge, on shelf or
counter; away from direct sunlight, heat source or extreme cold)
2. Clean up Plasticine bits from desk
3. Return all Plasticine and tools to the proper bin
4. Wipe hands with paper towel
5. Paper towel in garbage
6. Wash hands with soap and water
More Ideas:
Old CD case
Egg-Shaped "backer"

Self-Portraits & Story Illustrations
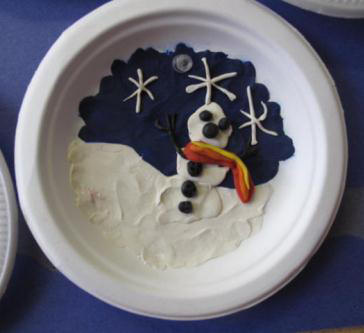
Small Styrofoam plate Plasticine sculptures