• Why do you think the root is the first thing to grow when the seed germinates?
Germination LESSON
Content Objective: Understand
how seeds germinate
Life Skill Objective: Learning
to learn through observing, experimenting, and
DO
(20
minutes)
Teacher
Note: Soak
enough dry lima beans overnight or for at least two hours in warm water
so each student can examine two beans.
Start the lesson by reading A Seed Is a Promise by Claire Merrill. Then explain that the students are going to look for the tiny plant inside the lima bean that the author wrote about. Distribute copies of the Germination
Record located at the end of the lesson and two soaked bean seeds. Draw an outline of a bean seed on the board. Proceed with the following discussion.
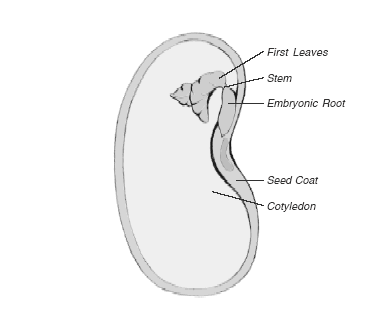
Take a close look at you bean seed. It is wearing a coat. When it is soaked in water, the coat
comes off. Gently rub the coat off between your fingers. The seed coat is protection for the embryo seed or baby plant. The seed coat may be thin like this bean seed or very thick like a coconut. Draw the seed coat on the bean seed picture. Draw a line to the seed coat and label it.(Draw and label it on the board.)
Feel the seed between your thumb and pointer finger. Can you feel a line that divides the seed into
parts? Use your fingernail and gently break the seed into two parts. What do you see?The two large pieces are called the
cotyledons (pronounced cot-i-LEE-dunz). They are sometimes called the “seed leaves” because they are the first “leaves” to emerge from the soil. Some plants such as corn have seeds with only one cotyledon, while plants such as beans have two. The cotyledons are the stored food for the young plant until it starts making its own food. Draw a line to the cotyledon on your drawing and label it. (Draw it on the board and label it.)On the inside curve of the bean seed you will see a tiny plant called the
embryo. The embryo has a root, stem, and leaves. Draw the embryo on your seed picture and label the root, stem, and leaves. (Draw it on the board and label it.)When water is present, the seed coat will soften and water will soak into the cotyledons. The
embryo soaks up some of the water and starts to grow. The root is the first part of the embryo to grow. It stretches out and pushes its way through the seed coat. The stem and leaves of the embryo then push out of the seed coat and grow up. The cotyledons on some plants such as beans grow above the soil. They stay in the soil on other plants such as corn. Put your seed diagram in your Growing in the Garden Journal folder.R
EFLECT (10 minutes, possibly the next day)Think about the story we read and your bean seeds to answer these
questions.• Why is a seed a promise?
• How are seeds made?
• How do seeds get planted?
• Why don’t all seeds grow into plants?
• What did the miner find in the frozen earth in northern Canada?
• Why were the seeds buried next to the lemming’s bones?
• What did the scientists do with the seeds?
• What happened to the seeds?
The seeds that the miner found were thought to be between 10,000-15,000 years old. They
grew into plants called Arctic Lupin, which have long spikes of flowers. You can find lupin plants at many garden stores in Iowa.We are learning about germination or how a seed begins to grow. Seeds are kind of like tiny time capsules. The seed is a time capsule that opens as soon as the conditions are right. For some seeds, this can be as soon as there is moisture present. Some tree seeds and tulip and daffodil bulbs need a few months of cold temperatures before they will sprout and grow. This prevents a seed from sprouting in the fall and the new, young plant from being killed by freezing temperatures.
Seeds of some plants need to pass through the body of a bird or animal before they will germinate. The acid in the stomach of the animals softens the seed coat, protecting the embryo. Once the seed passes through the animal, it is able to take up moisture and sprout.
Some seeds live a very long time, waiting for the right conditions before they start to grow. Seeds might be considered the “resting stage” of a plant. Seeds for a lily-like flower called lotus have been known to germinate or sprout more than 200 years after they fell from the plant. Seeds of beans and squash have been found in ancient ruins that are more than 500 years old. They were kept cool and dry in the ruins all that time. When planted and watered, they grew! Kind of like a time capsule that was opened hundreds of years later!
• What would happen to the seed if it were given enough water to start growing, then it dried out? (It would die.)
• Would a seed germinate if it were soaking in a glass full of water? Why not?
(no oxygen)• If a seed has a very hard seed coat, how can you make that seed germinate faster?
(Soak the seed or carefully break the hard seed coat.)
• Why do you think the root is
the first thing to grow when the seed germinates?
• Why is it helpful to know how long it takes for a seed to germinate?
• How do scientists conduct germination tests?
Teacher Note:
Divide the class into groups of three. Give each group an egg carton and 12 bean seeds. Have the students fill the cells of the egg cartons with potting soil and plant one bean seed 1/4-inch deep in each cell. With a pencil, have them number the cells on the lid beside the cell from one to 12. Have them water the soil well and set the egg cartons in a location that receives bright light.Have the students document the growth of their bean seeds on the Bean Seed Growth Chart on their
Germination Record pages.Two days later, have the children dig up the seeds in two cells in Row 1. They should record what they see
on their journal pages. Keep the soil moist, but not soggy, at all times.Four days later, have the children dig up the seeds in two cells in Row 2. They should record what they see
on their journal pages. Repeat every two or three days until all of the seeds have been dug up.Have the students keep the Germination Record pages in their Growing in the Garden Journal folders.
• What was the first part of the young plant to break out of the seed coat?
• How many days did it take before you saw the seedlings above the ground?
• What grew faster and longer on the young seedling, the stem or the roots?
• Were the cotyledons above or below the soil after the young plant came out of the soil?
Teacher Note:
You may want to invite a local farmer to class. Have him/her tell the students how he or she determines which kind of seed corn to buy.Have a local grower donate 20 untreated seeds from two or three different varieties. Put 10 seeds from one
variety on a damp, sturdy paper towel. Roll up the towel and place it in a clear plastic bag. Tape the name of the variety and the number of seeds on the top of the bag. Repeat for the other varieties. Set the bags in a location that receives indirect light. After 5 days, check the seeds.Which
variety germinated the best? That is one of the criteria farmers look at when they select which variety to plant.Reference
4Cork, Barbara.
Mysteries and Marvels of Plant Life. London: Usborne Publishing, 1983. ISBN 0-860-20756-0.Resource
Merrill, Claire.
A Seed Is a Promise. N.Y.: Scholastic Inc., 1973. ISBN 0-590-43454-3.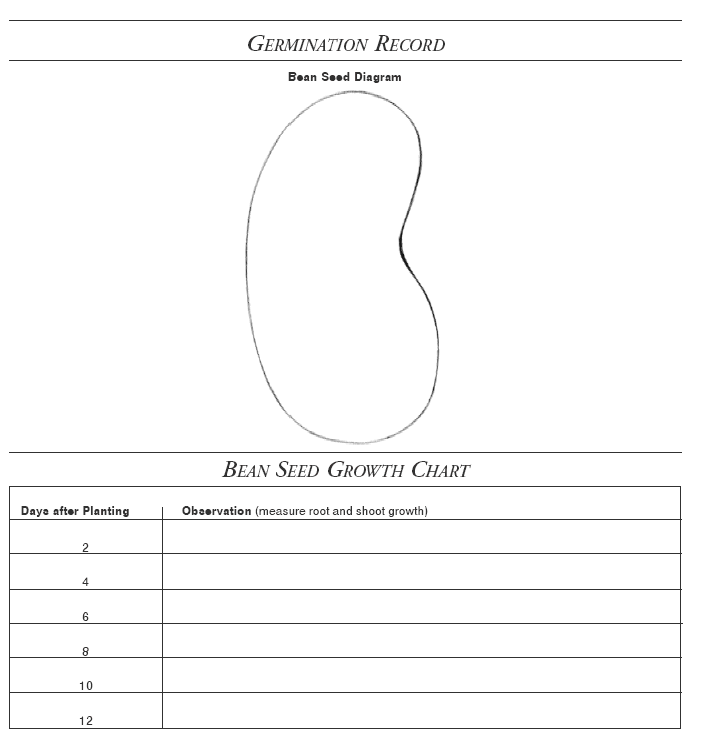
http://www.extension.iastate.edu/GrowingintheGarden/pdf/germ.pdf